[Prev]
[Next]
Cozy MKIV - Chapter 18 (Section 2)
Building the Canopy
Start Date: April 5, 1997
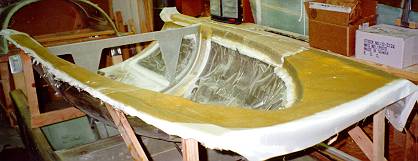
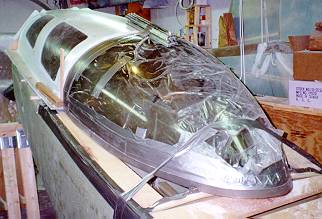 I unpacked the canopy and began fitting it to the fuselage and
TB, using a dremel tool grinding wheel to remove Acrylic material. After getting a good
fit at the TB and the instrument panel, I masked the edges, sanded them, and then floxed
the canopy to the TB. I then glassed 1 UNI around the lower perimeter of the canopy and
onto the TB, and glassed 3 BID over the top of the canopy onto the TB. You can see the
taped and protected canopy here, with wooden support boards underneath, steel weights on
top and wedges at the rear bottom rim to hold everything in place while the flox cures.
I unpacked the canopy and began fitting it to the fuselage and
TB, using a dremel tool grinding wheel to remove Acrylic material. After getting a good
fit at the TB and the instrument panel, I masked the edges, sanded them, and then floxed
the canopy to the TB. I then glassed 1 UNI around the lower perimeter of the canopy and
onto the TB, and glassed 3 BID over the top of the canopy onto the TB. You can see the
taped and protected canopy here, with wooden support boards underneath, steel weights on
top and wedges at the rear bottom rim to hold everything in place while the flox cures.
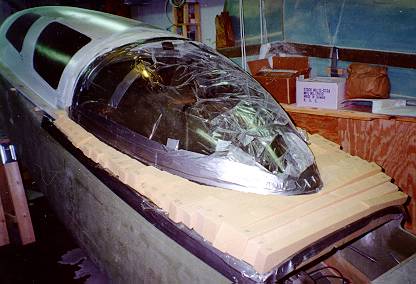
 You can see the "eyebrow" section (if you
imagine the canopy as a cyclops) in this image. I tried to ensure a smooth transition from
the turtleback to the canopy all around. Using a straight edge, this shape emerged as I
worked my way around the canopy perimeter. I decided to put a base layer of micro down to
fill in most of the dip and then put only one layer of glass over that for structure. This
will save a couple of ounces of weight.
You can see the "eyebrow" section (if you
imagine the canopy as a cyclops) in this image. I tried to ensure a smooth transition from
the turtleback to the canopy all around. Using a straight edge, this shape emerged as I
worked my way around the canopy perimeter. I decided to put a base layer of micro down to
fill in most of the dip and then put only one layer of glass over that for structure. This
will save a couple of ounces of weight.
 I then began cutting and carving the urethane foam for the canopy
rim/fuselage top - what a messy job! The urethane dust gets everywhere, and you make a ton
of it. I then micro'd all the urethane foam blocks to the lower canopy rim and to each
other.
I then began cutting and carving the urethane foam for the canopy
rim/fuselage top - what a messy job! The urethane dust gets everywhere, and you make a ton
of it. I then micro'd all the urethane foam blocks to the lower canopy rim and to each
other.
You can see the raw foam blocks micro'ed in place in this image.
I then began the artistic task of shaping all those rectangular blocks of urethane to
the correct curvature for the fuselage top. I used the templates to create three or four
approximate levels, and the sanded the blocks down to these levels using three different
sanding block. Talk about urethane dust! About 2 hours per side to complete the shaping to
something resembling the template shape will do it.
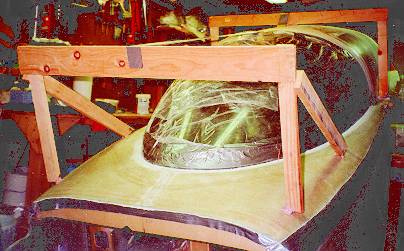 Once I had the foam shaped, I glassed the canopy/fuselage top with 2
BID and 2 UNI. I trimmed the layup around the edges and the canopy and then micro'd the
depression there. I then built the wooden frame that you can see in this image to support
the canopy when inverted. This frame caused some problems (note the missing cross member
on the bottom front) which you can read about in "Another
Oaf's Story". After jigging the turtledeck and canopy in place with the
requisite number of 1/16" thick mixing sticks, I cut the turtledeck off by hacksawing
through along the predrilled line.
Once I had the foam shaped, I glassed the canopy/fuselage top with 2
BID and 2 UNI. I trimmed the layup around the edges and the canopy and then micro'd the
depression there. I then built the wooden frame that you can see in this image to support
the canopy when inverted. This frame caused some problems (note the missing cross member
on the bottom front) which you can read about in "Another
Oaf's Story". After jigging the turtledeck and canopy in place with the
requisite number of 1/16" thick mixing sticks, I cut the turtledeck off by hacksawing
through along the predrilled line.
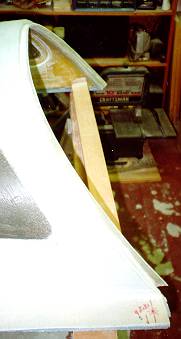 I sanded, floxed and micro'd the exposed drip rail inside
layups and foam, and then laid up the 2 BID outer drip rail, which you can see in the
photo to your right. I temporarily bondo'd a 1"x2" in place to keep the
turtleback spacing correct during glassing and subsequent installations and removals from
the fuselage tub. You can also see the red marking on the turtleback that tells me how
many mixing sticks to insert under the flange when installing on the tub, as well as the
location pin hole for a AN3 bolt that drops into a locating hole in the fuselage longeron.
I sanded, floxed and micro'd the exposed drip rail inside
layups and foam, and then laid up the 2 BID outer drip rail, which you can see in the
photo to your right. I temporarily bondo'd a 1"x2" in place to keep the
turtleback spacing correct during glassing and subsequent installations and removals from
the fuselage tub. You can also see the red marking on the turtleback that tells me how
many mixing sticks to insert under the flange when installing on the tub, as well as the
location pin hole for a AN3 bolt that drops into a locating hole in the fuselage longeron.
Next, I flipped the canopy and shaped the foam on the inside. I used pour foam to fill
voids, and checked multiple times to ensure that the foam would not interfere with the
instrument panel. I then laid up the 2 BID and 2 UNI inside layup, overlapping onto the
canopy as required. I floxed the 1/64" aluminum strips in place for the removable
fuselage top hinges prior to glassing. I used the EZ84/10 epoxy system for the first time
in this layup, hence the difference in color (much darker yellow). I found (for both the
inside and outside canopy layups and microing) that I ended up re-taping (with electrical
tape and duct tape) the perimeter of the canopy about four times each in order to trim
between layups and still get a clean edge. What a pain.
 In this photo on your left, you can see the inside of the canopy,
glassed with peel ply over it. Check "Another Oaf's
Story" to see what happened next.
In this photo on your left, you can see the inside of the canopy,
glassed with peel ply over it. Check "Another Oaf's
Story" to see what happened next.
End Date: May 31, 1997
[Prev]
[Next]
Copyright © 1997, All Rights Reserved, Marc J. Zeitlin