 Well, the first thing here was to rearrange the basement so that I
could fit the canard on the fuselage front without having to punch a hole in any of the
walls. This turned out to be relatively easy. You can see the spacious setup here:
Well, the first thing here was to rearrange the basement so that I
could fit the canard on the fuselage front without having to punch a hole in any of the
walls. This turned out to be relatively easy. You can see the spacious setup here:[Prev]
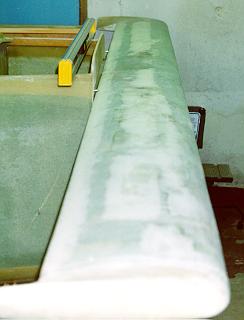
[Next] Well, the first thing here was to rearrange the basement so that I
could fit the canard on the fuselage front without having to punch a hole in any of the
walls. This turned out to be relatively easy. You can see the spacious setup here:
 Next, I jigged the fuselage straight and level. I drilled the #10
holes (I actually used a #11 drill for a tighter fit) in the fuselage longeron doublers
for the alignment pins, and then cut the heads off of the AN-3 bolts to create the pins.
Next, I jigged the fuselage straight and level. I drilled the #10
holes (I actually used a #11 drill for a tighter fit) in the fuselage longeron doublers
for the alignment pins, and then cut the heads off of the AN-3 bolts to create the pins.
I put the canard in place and iterated through sanding the fuselage area between F22 and F28 to let the canard sit straight and level in all directions. I also measured and adjusted the canard skew from the centerline of the back of the fuselage.
I laid up ten (10!) BID layers on the right front of F22 so that the Lift Tab would sit flush, and two BID on the left front of F22. After sanding these flat, the canard Lift Tabs sat flush on F22 when the canard was straight, aligned, un-skewed, and flat. I clamped the Lift Tabs to F22 and match drilled a #11 hole through the lift tabs (undrilled from Brock!) and F22.
 Next, I fabricated alignment tabs from 1/4" birch plywood
(didn't want to use foam). I drilled them out, fitted them to the alignment pins and the
canard, and then 5 minute epoxied them in place. I then floxed the corner and layed up 5
BID on the front surface lapping ~2" onto the canard, with a 1/16" spacer behind
the alignment tab. After that cured (and I trimmed and sanded it), I drilled out the #11
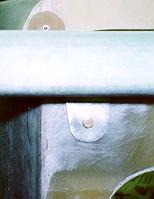
hole, and flipped the canard. I then layed up 4 BID on the rear surface of the alignment
tab lapping 1-1/2" onto the canard bottom, right up to the inboard hinges. After
cure, I drilled out the holes to 1/4" and press fitted the CN-2 bushings in place.
You can get a lousy view of the lift and alignment tabs here:
Next, I fabricated alignment tabs from 1/4" birch plywood
(didn't want to use foam). I drilled them out, fitted them to the alignment pins and the
canard, and then 5 minute epoxied them in place. I then floxed the corner and layed up 5
BID on the front surface lapping ~2" onto the canard, with a 1/16" spacer behind
the alignment tab. After that cured (and I trimmed and sanded it), I drilled out the #11
hole, and flipped the canard. I then layed up 4 BID on the rear surface of the alignment
tab lapping 1-1/2" onto the canard bottom, right up to the inboard hinges. After
cure, I drilled out the holes to 1/4" and press fitted the CN-2 bushings in place.
You can get a lousy view of the lift and alignment tabs here:
 Once that was done, I trimmed the inboard elevators square and
even to leave room for eventual fuselage elevator fairings. Nat doesn't call for these,
but I saw some beauties at Oshkosh and decided to do it instead. Then I glassed the
elevator inboard ends. I then cutout the fuselage for the elevator offsets and began
shaping the filler pieces. I glassed the filler pieces to the canard. You can make out the
filler pieces here:
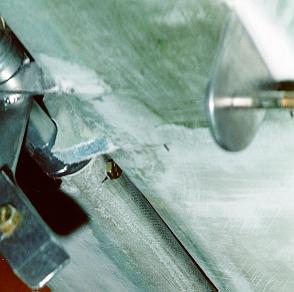
Once that was done, I trimmed the inboard elevators square and
even to leave room for eventual fuselage elevator fairings. Nat doesn't call for these,
but I saw some beauties at Oshkosh and decided to do it instead. Then I glassed the
elevator inboard ends. I then cutout the fuselage for the elevator offsets and began
shaping the filler pieces. I glassed the filler pieces to the canard. You can make out the
filler pieces here:
I glassed 1 BID over the fuselage sides where the foam was exposed, and up onto F28. I then re-drilled the alignment tab pin holes. I didn't flox the pins in place, as I will eventually replace them with metal tubes and long bolts so that I can remove four bolts and then lift the canard straight up out of the fuselage rather than having to wrestle and wriggle it out.
P.S. - As it turns out, I did in fact flox the pins in place, as I had no trouble getting the canard in and out of the fuselage even after the nose and canard cover were installed.
[Prev]
[Next]| [Zeitlin's Cozy MKIV Information] [Zeitlin's Cozy MKIV Logbook] [Cozy MKIV Information] |
Copyright © 1995, 1996, All Rights Reserved, Marc J. Zeitlin