[Prev][Next]
Cozy MKIV - Chapter 11
Building the Elevators
Start Date: July 9, 1995
I started out by filing the corners of the NC-2 torque tube inserts to
fit. You'd think that with the same vendor (Ken Brock making the
inserts and the tubes) you wouldn't have to modify anything to make them
work, but no. I cut 3" off the ends of the tubes (to match the
shortened canard length) and then pop-riveted the NC-2's to the torque
tubes. The plans don't mention that there's a left and a right version
and you better pay attention to the orientation of the NC-2's, or else
the hinge rod won't fit. One of the NC-2's was not perfectly aligned
(after pop-riveting) so I had to use a long drill and reamer to open the
hinge pin hole a few thousandths. I'd recommend having the hinge pin
installed when doing the pop-riveting to ensure alignment. I sanded the
tubes with 220 grit, and put them aside.
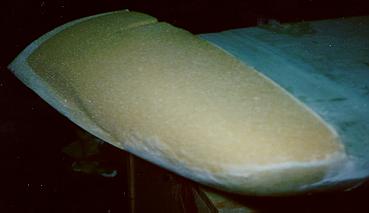
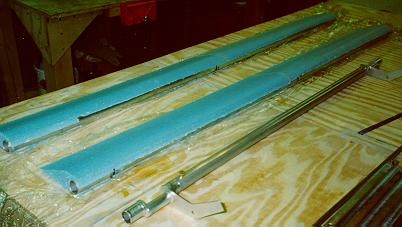 I then cut the elevator core templates out of 1/16" aluminum. Deanie
and I hot-wired the four elevator cores. I THINK we could have done it
with only two cores (I have a LONG hot-wire saw) but decided to just
follow the plans. After cutting out the "J" and "L" jigs from plywood,
I micro'ed the foam cores to the torque tubes. The plans seem to
indicate that you could slip the foam over the torque tubes, but I
found that if I tried that, the foam would break. I had to slide the
foam onto the tubes lengthwise. Of course, I could no longer keep the
torque tube jigs in place, since they'd rip the foam to shreds as well,
so I applied the micro to the foam (and a little to the tube), and then
slid the foam all the way onto the tube. I cut away the foam near the
hinge openings, put the hinge pin and the jig(s) in place, and then
rotated the foam so that it was flat while the torque tube was rotated
all the way onto the jigs. I may be dim, but it took me a few minutes
of staring at the picture in the plans to figure out the orientation of
the foam and the torque tubes with respect to the jigs. Finally, the
dotted line (a little hard to see) gave it away. Make sure the tube is
resting on the jigs while the foam is flat. Here are the foam cores
after micro'ing to the torque tubes:
I then cut the elevator core templates out of 1/16" aluminum. Deanie
and I hot-wired the four elevator cores. I THINK we could have done it
with only two cores (I have a LONG hot-wire saw) but decided to just
follow the plans. After cutting out the "J" and "L" jigs from plywood,
I micro'ed the foam cores to the torque tubes. The plans seem to
indicate that you could slip the foam over the torque tubes, but I
found that if I tried that, the foam would break. I had to slide the
foam onto the tubes lengthwise. Of course, I could no longer keep the
torque tube jigs in place, since they'd rip the foam to shreds as well,
so I applied the micro to the foam (and a little to the tube), and then
slid the foam all the way onto the tube. I cut away the foam near the
hinge openings, put the hinge pin and the jig(s) in place, and then
rotated the foam so that it was flat while the torque tube was rotated
all the way onto the jigs. I may be dim, but it took me a few minutes
of staring at the picture in the plans to figure out the orientation of
the foam and the torque tubes with respect to the jigs. Finally, the
dotted line (a little hard to see) gave it away. Make sure the tube is
resting on the jigs while the foam is flat. Here are the foam cores
after micro'ing to the torque tubes:
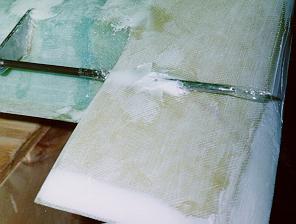
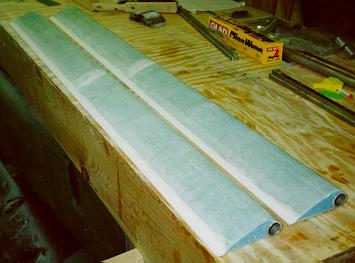 I then cut the center spool piece from the aluminum tubing and attached
the CZNC-12A offsets to the spool piece with the AN3 screws. I cut the
glass for the elevator skins and layed up 2 UNI on the elevator bottoms.
After sanding and fairing the glass to the torque tube, I layed up the
top skin from 2 UNI. Here are the elevators after glassing and
micro'ing:
I then cut the center spool piece from the aluminum tubing and attached
the CZNC-12A offsets to the spool piece with the AN3 screws. I cut the
glass for the elevator skins and layed up 2 UNI on the elevator bottoms.
After sanding and fairing the glass to the torque tube, I layed up the
top skin from 2 UNI. Here are the elevators after glassing and
micro'ing:
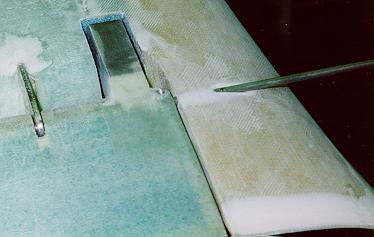
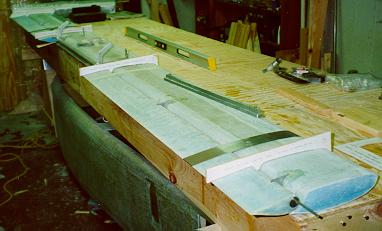 After sanding, shaping, and straightening the elevators, I glassed 1 BID
on the outboard ends, and then installed the NC-6's in the torque tubes.
I assembled and jigged the elevators for assembly to the canard, routed
the holes in the dense white foam of the canard for the hinge points,
and then floxed the hinges in place (1/8" showing above the surface).
After sanding, shaping, and straightening the elevators, I glassed 1 BID
on the outboard ends, and then installed the NC-6's in the torque tubes.
I assembled and jigged the elevators for assembly to the canard, routed
the holes in the dense white foam of the canard for the hinge points,
and then floxed the hinges in place (1/8" showing above the surface).
Here is the canard jigged for elevator hinge installation. You can see
the hinges floxed in place, as well as the NC-6 insert and the end BID
layup on the elevators:
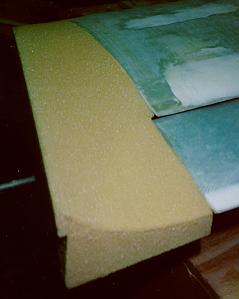 I jigged the canard for tip attachment, and the cut the urethane foam
for the tips. I micro'ed and 5 minute epoxied the tip foam to the tips
of the canard, and then shaped the tip tops. My hand sander had almost
exactly the right curvature on the top to fair the tips into the top
surface. Here you can see the urethane foam carved canard tip top
surface prior to glassing:
I jigged the canard for tip attachment, and the cut the urethane foam
for the tips. I micro'ed and 5 minute epoxied the tip foam to the tips
of the canard, and then shaped the tip tops. My hand sander had almost
exactly the right curvature on the top to fair the tips into the top
surface. Here you can see the urethane foam carved canard tip top
surface prior to glassing:
 I layed up the 2 UNI layers on the tip tops, let it cure, and then
flipped the canard. I carved the tip bottoms by eye.
I layed up the 2 UNI layers on the tip tops, let it cure, and then
flipped the canard. I carved the tip bottoms by eye.
Here you can see the tip bottom surface prior to glassing:
I layed up the 2 UNI layers on the tip bottoms and used any and all
excess micro to continue filling the canard, either on the top or the
bottom. I let it cure, and at this point, I went to OSHKOSH
'95!!!!!
 After getting back, I sanded the tips and the canard. [This procedure
would occur multiple times (and will continue to occur multiple MORE
times). Any time I have excess epoxy, I mix up dry micro and fill
either the top or bottom surface of the canard].
After getting back, I sanded the tips and the canard. [This procedure
would occur multiple times (and will continue to occur multiple MORE
times). Any time I have excess epoxy, I mix up dry micro and fill
either the top or bottom surface of the canard].
Once the tips were done, I drilled the holes for the hinge pins in them
in line with the other hinges. Instead of using a plastic or metal tube
through the holes, I wrapped Saran Wrap (tm) around the hinge pin and
packed the hole with micro. This worked well. I then files and sanded
the hinge pin tips to match the shape of the canard tips. Here's this
business:
 Next, I carved some foam for the outboard elevator mass balances and
glassed them in place with two UNI layers. I made a cutout in the
canard where the mass balances would have to recess, and glassed that
with one BID. The inboard mass balances (as well as the torque tube
offsets) from Brock Mfg. had not had mounting holes drilled in them, so
I drilled them out and mounted the inboard mass balances. Here's the
mass balances in their recesses:
Next, I carved some foam for the outboard elevator mass balances and
glassed them in place with two UNI layers. I made a cutout in the
canard where the mass balances would have to recess, and glassed that
with one BID. The inboard mass balances (as well as the torque tube
offsets) from Brock Mfg. had not had mounting holes drilled in them, so
I drilled them out and mounted the inboard mass balances. Here's the
mass balances in their recesses:
End Date: August 20, 1995
Addendum:
I later determined that I had a problem with the shape of the trailing
edge of the canard and the positioning of the elevator in relation to
the canard trailing edge. I would caution all COZY builders to read the
description, as a few builders have said they had the same thing happen
to them, and the problem may be common one.
The
Canard/Elevator Issue/Problem page describes the issue, some
suggested solutions, and my plan of attack.
[Prev][Next]
Copyright © 1995, 1996, All Rights Reserved, Marc J. Zeitlin