[Prev][Next]
Cozy MKIV - Chapter 10
Building the Canard
Start Date: May 30, 1995
 I decided to make the hot wire templates out of 1/16" aluminum. I used 3M
spray adhesive #77 to glue the paper templates to the aluminum, and then
carefully cut them out to within 1/32" of the line with a bandsaw. I used
a 1" belt sander to sand the rest of the shape, and files what I couldn't
sand. I made the straight cut templates out of 1/8" masonite. I convinced
my wife, Deanie, to assist in the hot-wiring, and we practiced making the
straight cuts to get the core trapezoids.
I decided to make the hot wire templates out of 1/16" aluminum. I used 3M
spray adhesive #77 to glue the paper templates to the aluminum, and then
carefully cut them out to within 1/32" of the line with a bandsaw. I used
a 1" belt sander to sand the rest of the shape, and files what I couldn't
sand. I made the straight cut templates out of 1/8" masonite. I convinced
my wife, Deanie, to assist in the hot-wiring, and we practiced making the
straight cuts to get the core trapezoids.
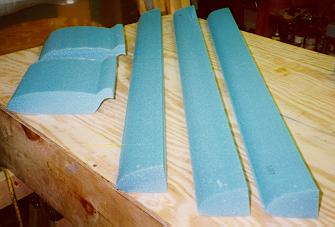
 After a few cuts, we had the cut speed nailed, and proceeded to the
actual core cuts with real templates. Turns out my wife is a hot-wire
PRO! The most important thing in hot-wiring, IMHO, is fine motor skills;
i.e. keep a heavy thing moving slowly at a constant rate. Our cores
looked primo! Here they are (after all cuts, including the shear web
separation):
After a few cuts, we had the cut speed nailed, and proceeded to the
actual core cuts with real templates. Turns out my wife is a hot-wire
PRO! The most important thing in hot-wiring, IMHO, is fine motor skills;
i.e. keep a heavy thing moving slowly at a constant rate. Our cores
looked primo! Here they are (after all cuts, including the shear web
separation):
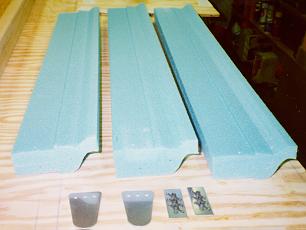
 Next, I riveted the nutplates onto the shear web 1/8" aluminum inserts
(from Brock MFG). After test jigging the rear canard cores vertically
in between two 2" x 4" 's, I held everthing in place with nails,
micro'ed the left and right cores to the center core, and then used a
couple of templates to locate and micro the inserts into the center
core. I then masked the bottom of the cores with tape so that epoxy
wouldn't drip on it, and glassed the shear web. Here's the finished
web:
Next, I riveted the nutplates onto the shear web 1/8" aluminum inserts
(from Brock MFG). After test jigging the rear canard cores vertically
in between two 2" x 4" 's, I held everthing in place with nails,
micro'ed the left and right cores to the center core, and then used a
couple of templates to locate and micro the inserts into the center
core. I then masked the bottom of the cores with tape so that epoxy
wouldn't drip on it, and glassed the shear web. Here's the finished
web:
 Once that was done, I drilled out the 1/4" holes for the alignment
dowels and the insert nutplates, jigged the cores with the bottom side
up, made sure the front cores fit in place, and then hot glued all the
rear cores to the support templates, making sure they were straight and
level.
Once that was done, I drilled out the 1/4" holes for the alignment
dowels and the insert nutplates, jigged the cores with the bottom side
up, made sure the front cores fit in place, and then hot glued all the
rear cores to the support templates, making sure they were straight and
level.
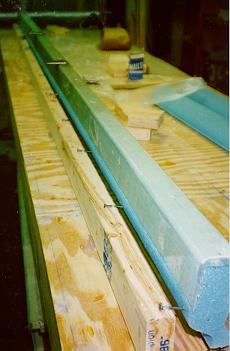
I then micro'ed the front cores to the rear cores, using the dowels for
alignment. I micro'ed the spar cap corner radii, as well as any dings
and dents in the foam. I layed up the bottom spar cap, staggering and
tapering the ends of the 3" wide unidirectional tape. I used 9 layers
of the tape, and filled the spar cap trough to the top. The preparation
for the layup looked like:
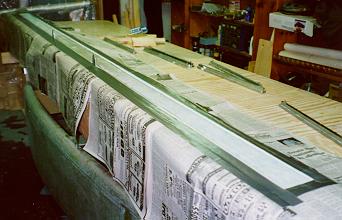
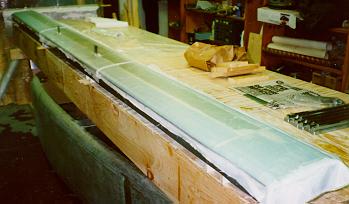 Then I glassed the UNI/BID/UNI bottom canard skin. Here's the bottom
layup under peel-ply:
Then I glassed the UNI/BID/UNI bottom canard skin. Here's the bottom
layup under peel-ply:
 After sanding the bottom skin smooth, I hot glued 1-1/4" PVC drain pipe
to the canard elevator recess, mounted five 1" x 4" x 8" wood jigs to
the canard, and flipped the whole thing to work on the top of it. I
then made the PVC foam hinge mount points, hollowed out spaces for them
in the foam, and micro'ed them in place. I also micro'ed the spar cap
radii (and dents and dings in the foam). Next, I layed up the top spar
cap, using the same technique as for the bottom. Tapering the end
cuts of the 3" wide spar cap tape is critical! (As it was for the
bottom cap). It allows the end of each layer to blend into the previous
layer without ANY bump or joggle. Nat doesn't stress this enough in the
plans.
After sanding the bottom skin smooth, I hot glued 1-1/4" PVC drain pipe
to the canard elevator recess, mounted five 1" x 4" x 8" wood jigs to
the canard, and flipped the whole thing to work on the top of it. I
then made the PVC foam hinge mount points, hollowed out spaces for them
in the foam, and micro'ed them in place. I also micro'ed the spar cap
radii (and dents and dings in the foam). Next, I layed up the top spar
cap, using the same technique as for the bottom. Tapering the end
cuts of the 3" wide spar cap tape is critical! (As it was for the
bottom cap). It allows the end of each layer to blend into the previous
layer without ANY bump or joggle. Nat doesn't stress this enough in the
plans.
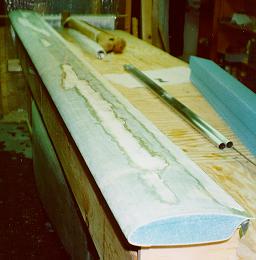
Next, I glassed the UNI/BID/UNI/UNI top skin, and filled the low spots
with dry micro. Here's the canard on the bench after glassing the top
skin (and applying some micro):
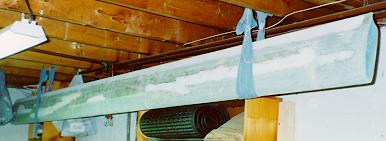 Here's the raw glassed and partially micro'ed canard hanging in what
will be its resting place for the next year or so (after I finish
Chapter 12):
Here's the raw glassed and partially micro'ed canard hanging in what
will be its resting place for the next year or so (after I finish
Chapter 12):
End Date: July 10, 1995
[Prev][Next]
Copyright © 1995, 1996, All Rights Reserved, Marc J. Zeitlin