[Prev][Next]
Cozy MKIV - Chapter 13 (Section 4)
Nose Sides, Top and Exterior
Start Date: March 23, 1996
Ah, well, you've made it through the
nose cone, etc. section. I cut out and carved the fuselage nose
sides from 2" urethane foam, and then glassed the inside surface with 2
BID. I then microed and 2 BID taped the sides to F22, F0 and the nose
floor and added the 3 BID pads over the canard mount points. I then
flipped the fuselage over.
 I sanded the fuselage nose bottom and sides to shape using my 3' spline
sander, as well as a couple of smaller one and two hand sanding tools.
After a couple of hours, it looked pretty good. I then carved the
nosewheel well to match the shape of the nosewheel cover, and cut 1/4"
plywood for the nose bumper mount. I also cut the hockey puck (no joke,
that's what you use for a nose bumper - my 8 1/2 year old son didn't
believe me when I told him I was installing a hockey puck into the
plane!) for the nose bumper.
I sanded the fuselage nose bottom and sides to shape using my 3' spline
sander, as well as a couple of smaller one and two hand sanding tools.
After a couple of hours, it looked pretty good. I then carved the
nosewheel well to match the shape of the nosewheel cover, and cut 1/4"
plywood for the nose bumper mount. I also cut the hockey puck (no joke,
that's what you use for a nose bumper - my 8 1/2 year old son didn't
believe me when I told him I was installing a hockey puck into the
plane!) for the nose bumper.
I floxed and glassed the bumper mount and bumper in place, and glassed
the rim of the wheel well. I then taped the fuselage sides for
protection from future layups. I also tried
"hard-shelling" the nose foam with alcohol thinned
epoxy loaded with about twice the normal amount of micro. This seemed to
work OK, although I'm not sure that the urethane foam is a reasonable
test. I microed some 1/4" and 3/8" foam to the top of the nose gear
strut, since it was substantially below the level of the fuselage nose
bottom. Next, I sanded the "hard-shell", and then glassed 2 BID over the
whole nose bottom, with a 3rd BID strip over the strut.
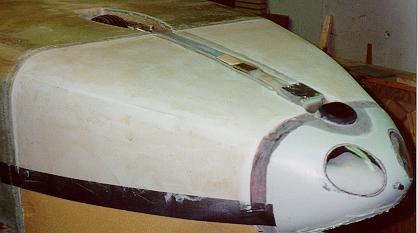
 After microing and sanding the nose-to-fuselage and nose-to-nose cone
interfaces flush and smooth, I cut the nose strut free with a hacksaw
blade. I didn't like the way the strut looked, so I trimmed and sanded
the strut and the surrounding nose area, and then laid up 2 BID over the
strut to overlap the fuselage a bit (with saran wrap underneath so I
could remove it :-). After trimming, this looked a LOT better. I also
cut out the nosewheel sheet metal (0.031" aluminum), turned some spacers
on a lathe (remember, the strut ended up substantially below the skin)
and screwed them onto the nose strut pieces. One last layer of BID and
micro on the inside surface of the strut and any exposed foam, and the
strut was done.
After microing and sanding the nose-to-fuselage and nose-to-nose cone
interfaces flush and smooth, I cut the nose strut free with a hacksaw
blade. I didn't like the way the strut looked, so I trimmed and sanded
the strut and the surrounding nose area, and then laid up 2 BID over the
strut to overlap the fuselage a bit (with saran wrap underneath so I
could remove it :-). After trimming, this looked a LOT better. I also
cut out the nosewheel sheet metal (0.031" aluminum), turned some spacers
on a lathe (remember, the strut ended up substantially below the skin)
and screwed them onto the nose strut pieces. One last layer of BID and
micro on the inside surface of the strut and any exposed foam, and the
strut was done.
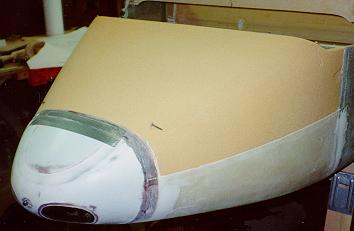
 After flipping the fuselage back over (right side up) I cut the foam for
the fuselage top, as well as making a template (from the plans) for the
top longitudinal curvature out of some stiff 1/4" foam. After tacking
the top foam in place with 5 minute epoxy and carving/sanding for a
while, I found that the nose was too low with respect to F28, so I remade
the curvature template, added 3/4" foam spacers under the top foam, and
resanded the top to shape:
After flipping the fuselage back over (right side up) I cut the foam for
the fuselage top, as well as making a template (from the plans) for the
top longitudinal curvature out of some stiff 1/4" foam. After tacking
the top foam in place with 5 minute epoxy and carving/sanding for a
while, I found that the nose was too low with respect to F28, so I remade
the curvature template, added 3/4" foam spacers under the top foam, and
resanded the top to shape:
I then
"hard-shelled" the fuselage nose with the epoxy/alcohol/micro
mixture (again, not clear how well this works on urethane).
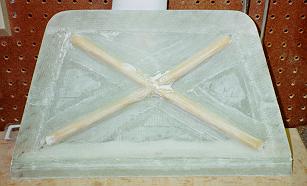
The next step involved marking the top for the large nose door and laying
up three layers of BID over release tape over the door outline. After
peeling off the door layup, I added the three plies of BID around the
rim, and added a couple of one BID layers over foam spacers in a cross
hatch pattern as door panel stiffeners (not called out in the plans).
After sanding the door recess into the nose top and ensuring that the
large nose door would nestle into the recess perfectly flush with the
surrounding surface, I glassed 2 BID over the nose top.
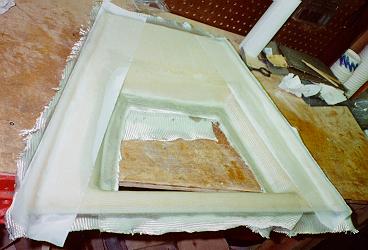 I trimmed and sanded the nose top layup, and then cut out the large nose
door access hole. Next I cut the nose top off (per plans!) and
sanded and shaped the bottom of the nose top for glassing with 1 BID (and
extra 2 BID layers around the nose door access hole. Then I glassed
it.
I trimmed and sanded the nose top layup, and then cut out the large nose
door access hole. Next I cut the nose top off (per plans!) and
sanded and shaped the bottom of the nose top for glassing with 1 BID (and
extra 2 BID layers around the nose door access hole. Then I glassed
it.
End Date: April 24, 1996
[Prev][Next]
Copyright © 1996, All Rights Reserved, Marc J. Zeitlin