[Prev][Next]
Cozy MKIV - Chapter 13 (Section 3)
Nose Cone / Landing Lights / Pitot-Static Tube(s)
Start Date: March 3, 1996
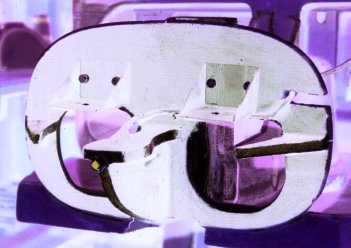 I started out by making and mounting the NG-31 and NG-32 bulkheads to F-0
and then cutting holes and spaces in them (and F-0) to clear the landing
lights. You can (barely) make this out here in this psychedelic
version of a photograph. I also trimmed the outside of the bulkheads so
that the nose cone (from AeroCad) would fit snugly.
Next, I made sheet metal brackets (also visible here) to which to bolt
the landing lights. These fasten to F-0 with AN-3 bolts and nutplates on
an aluminum backing plate glassed to the back of F-0.
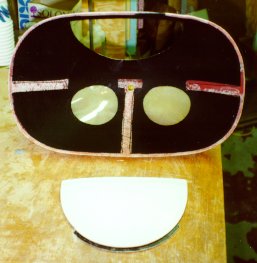 Next, I attacked the landing light windows in the nose cone. First, I
looked at the nose cone from directly ahead, measured where the center of
the lights would end up, and then drew circles on the nose cone of the
diameter of the landing lights. Of course, on the ellipsoid nose cone,
the projected circles end up as some god-awful elliptical shape. I then
cut out sheets of 1/8" Plexiglas (actually Perspex) to a slightly larger
size than the windows would be, heated them to ~300 deg. F in the oven,
and molded them to shape over the nose cone by pushing on them with oven
mitts. Worked pretty well, at least on the second attempt :-). Then I
cut out the openings for the windows in the nose cone, and slowly sanded
the windows smaller while sanding the openings larger, until I had about
1/8" overlap all the way around. I then sanded a 30 degree angle on the
rims of the windows and the inside of the opening, so that when I
positioned the windows in the openings they sat essentially flush with
the exterior of the nose cone. Then I floxed the windows in place, after
masking them with electrical tape. You can see the window positions in
this view of the inside of the nose cone (after painting flat black to
reduce reflections and glare.
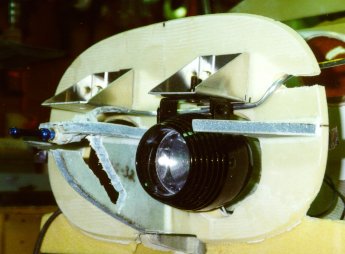
While futzing with all that, I had installed (floxed in) the removable
pitot tube in the nose bulkheads. After thinking about it, I didn't like
the "dip" that the line took, and I dug out the whole thing and
reinstalled it so that the line has a constant upward slope as it heads
rearward. You can see the pitot line here, with the old position of the
line in the removed section of the bulkhead:
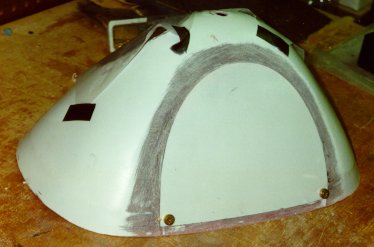
I made a removable door for the nose cone (provided with the nose cone
from AeroCad) by glassing a lip around the front of the door so that it
was captured in the front). Two screws (with nutplates) hold the door
on.
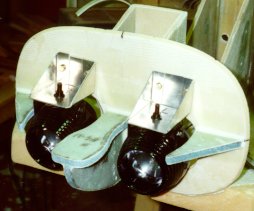
You can see both landing lights installed here (prior to pitot tube
installation).
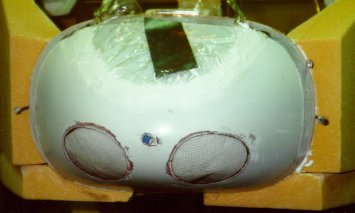 This view shows the nose cone floxed in position with micro around the
door (to fair it in). You can see the LL windows in the lower area, and
the pitot tube attachment in the center (with a plug in it). After
attachment, I repainted the whole interior flat black. You can also see
the fuselage sides microed in place just behind the nose cone, with the
fuselage bottom underneath (all prior to final shaping).
Last, but not least, I marked the fuselage sides for the position of the
static ports, drilled out the foam from the inside, bent up the soft 1/4"
aluminum tubing to fit, and microed one tube in place on each side of the
fuselage. After cure and sanding, I drilled three 1/16" holes into each
static port tube.
End Date: March 29, 1996
[Prev][Next]
Copyright © 1996, All Rights Reserved, Marc J. Zeitlin
 Next, I attacked the landing light windows in the nose cone. First, I
looked at the nose cone from directly ahead, measured where the center of
the lights would end up, and then drew circles on the nose cone of the
diameter of the landing lights. Of course, on the ellipsoid nose cone,
the projected circles end up as some god-awful elliptical shape. I then
cut out sheets of 1/8" Plexiglas (actually Perspex) to a slightly larger
size than the windows would be, heated them to ~300 deg. F in the oven,
and molded them to shape over the nose cone by pushing on them with oven
mitts. Worked pretty well, at least on the second attempt :-). Then I
cut out the openings for the windows in the nose cone, and slowly sanded
the windows smaller while sanding the openings larger, until I had about
1/8" overlap all the way around. I then sanded a 30 degree angle on the
rims of the windows and the inside of the opening, so that when I
positioned the windows in the openings they sat essentially flush with
the exterior of the nose cone. Then I floxed the windows in place, after
masking them with electrical tape. You can see the window positions in
this view of the inside of the nose cone (after painting flat black to
reduce reflections and glare.
 I started out by making and mounting the NG-31 and NG-32 bulkheads to F-0
and then cutting holes and spaces in them (and F-0) to clear the landing
lights. You can (barely) make this out here in this psychedelic
version of a photograph. I also trimmed the outside of the bulkheads so
that the nose cone (from AeroCad) would fit snugly.


 This view shows the nose cone floxed in position with micro around the
door (to fair it in). You can see the LL windows in the lower area, and
the pitot tube attachment in the center (with a plug in it). After
attachment, I repainted the whole interior flat black. You can also see
the fuselage sides microed in place just behind the nose cone, with the
fuselage bottom underneath (all prior to final shaping).