 I began by cutting out the 3/8" foam for the headrest and
shoulder support, as well as the 1/4" foam for the heat duct. I cut out
the 1/4" plywood for the shoulder harness attach points, and hot melt
glued them ito the 3/8" foam for the shoulder harness. I also glued the
two shoulder support pieces together. I then cut four 1/4" plywood
pieces for the seat belt attach points, and shaped them to fit snugly
against the fuselage interior. I cut three 90 degree supports for the
shoulder support from 3/4" foam (to support it while the first layup
cures. Next, I cut the BID glass for all the first side layups. This
picture shows all the pieces:
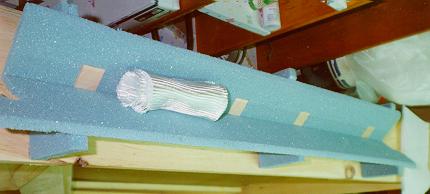
I began by cutting out the 3/8" foam for the headrest and
shoulder support, as well as the 1/4" foam for the heat duct. I cut out
the 1/4" plywood for the shoulder harness attach points, and hot melt
glued them ito the 3/8" foam for the shoulder harness. I also glued the
two shoulder support pieces together. I then cut four 1/4" plywood
pieces for the seat belt attach points, and shaped them to fit snugly
against the fuselage interior. I cut three 90 degree supports for the
shoulder support from 3/4" foam (to support it while the first layup
cures. Next, I cut the BID glass for all the first side layups. This
picture shows all the pieces:
|
 And the shoulder support:
|
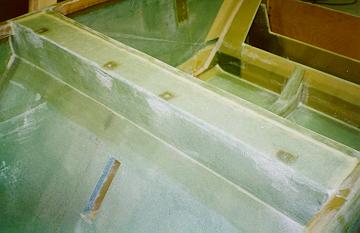 I micro'ed the foam, and put 1 BID on the headrest and shoulder
support pieces, and 2 BID on the heatduct pieces. After waiting 3 - 4
hrs. for partial set-up of the shoulder support, I floxed it to the
(sanded) seatback bulkhead, and wetted out the overhanging glass. I peel
ply'ed the two strips, and left it alone. I then removed the peel ply,
sanded the un-peel-ply'ed areas, and beveled the foam around the shoulder
harness plywood pieces.
I micro'ed the foam, and put 1 BID on the headrest and shoulder
support pieces, and 2 BID on the heatduct pieces. After waiting 3 - 4
hrs. for partial set-up of the shoulder support, I floxed it to the
(sanded) seatback bulkhead, and wetted out the overhanging glass. I peel
ply'ed the two strips, and left it alone. I then removed the peel ply,
sanded the un-peel-ply'ed areas, and beveled the foam around the shoulder
harness plywood pieces.
|
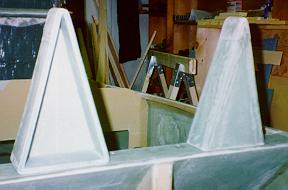 Next, I hot glue'd the headrest pieces and the heat duct pieces together,
and also carved the foam for the head duct transition piece. I sanded the
heat duct and headrest corners, and then glassed them with UNI and BID
cloth. I also glassed the outside of the shoulder support with the 12
plies of BID on the hard points, and 2 BID all over. After they cured, I
sanded everything smooth. The above picture shows what all that looks
like:
Next, I hot glue'd the headrest pieces and the heat duct pieces together,
and also carved the foam for the head duct transition piece. I sanded the
heat duct and headrest corners, and then glassed them with UNI and BID
cloth. I also glassed the outside of the shoulder support with the 12
plies of BID on the hard points, and 2 BID all over. After they cured, I
sanded everything smooth. The above picture shows what all that looks
like:
|
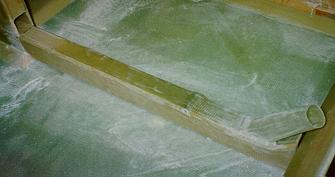 I sanded the outer seat belt fuselage mount points, as well as
the fuselage bottom where the seat belt reinforcements and the heat duct
would go. After cleaning up the 43 pounds of dust, I floxed the plywood
seat belt hard points and the heat duct to the fuselage, and then glassed
them in place with 7 and 2 BID, respectively. This image shows the
heatduct floxed in place.
I sanded the outer seat belt fuselage mount points, as well as
the fuselage bottom where the seat belt reinforcements and the heat duct
would go. After cleaning up the 43 pounds of dust, I floxed the plywood
seat belt hard points and the heat duct to the fuselage, and then glassed
them in place with 7 and 2 BID, respectively. This image shows the
heatduct floxed in place.
|
Lastly, I drilled all the holes for the seat belt attachment angle brackets
and the step, and had to order longer screws for the step attachment. I
floxed all the angles in place, screwed them down tight, and floxed over
the screw heads. I glassed the seatbelt center attach points with 4 BID
and 3 UNI, peel-plyed the layups and was done.