I then floxed the lower firewall in place.
 First, I took my table off the sawhorses and put it on the floor. I then
snapped a centerline, left space at the firewall end for the vertical
brace, and screwed some 2x4's to it for the front bulkhead (F22) and
firewall support. After a lot of dorking around, I finally got the
fuselage sides in place with the firewall and F22, but couldn't get
them both level at the same time. I then realized my floor wasn't true,
and after some judicious shimming, got the firewall and F22 vertical
and centered, the sides level (fore and aft) and level with each other.
First, I took my table off the sawhorses and put it on the floor. I then
snapped a centerline, left space at the firewall end for the vertical
brace, and screwed some 2x4's to it for the front bulkhead (F22) and
firewall support. After a lot of dorking around, I finally got the
fuselage sides in place with the firewall and F22, but couldn't get
them both level at the same time. I then realized my floor wasn't true,
and after some judicious shimming, got the firewall and F22 vertical
and centered, the sides level (fore and aft) and level with each other.I used a 4 ft. "Smart Level" for all of this, and I've got to say it's great. Reads to 0.1 degree (near horizontal or vertical), so I know that when it says 0.0, I'm dead nuts on. Some calibration of my 3 ft. bubble level showed that I could get to within +/- 0.1 degrees, but you wouldn't know that from looking at it, and it's a LOT harder. About $80 from Aircraft Spruce and Specialty - not the latest model, but still....... I wouldn't go back to the bubble level.
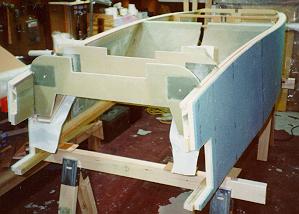
Then I took the instrument panel and the seatback bulkhead, and did a rough test of the fit in the fuselage sides, cutting and shaping the bulkheads for a snug fit. I drilled the nail holed (for 6d nails) throught the sides and into the bulkheads, and held everything in place. I used a couple of 1x2's and some rope to test the squeeze of the sides near the seatback bulkhead. After spreading the fuselage sides about 4-5", I buttered the bulkheads and sides with flox, squeezed everything together, checked all the level lines, and satisfied myself that everything was aligned. I then covered the assembly with 4 mil poly, put a space heater underneath, and kept the whole thing at about 95 degrees overnight. Voila, a fuselage. The first picture shows what it looks like at this point:
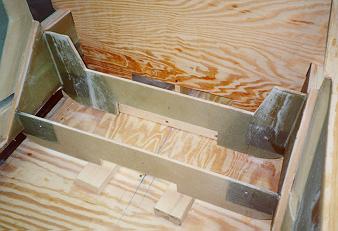
| Next, I glassed the 2 BID strips for the bulkheads, and then floxed and glassed the front lower and rear landing gear bulkheads in place. Here's what that looks like: |
|
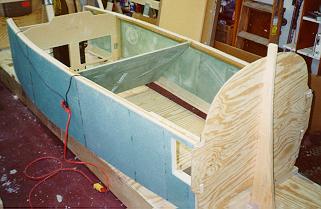
| I then drilled the 1/4" pilot hole for the landing gear using the alignment
jigs in the plans, and floxed the front upper L.G. bulkhead in place. The
front L.G. bulkheads then got their front UNI and BID layups, and then I
flipped the fuselage in order to work on the underside. The front L.G.
bulkheads then got their rear UNI and BID layups. Here's the flipped
fuselage: I then floxed the lower firewall in place. |
|
|
[Zeitlin's Cozy MKIV Information]
[Zeitlin's Cozy MKIV Logbook] [Cozy MKIV Information]
|