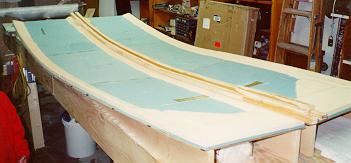
 So, I cut out the fuselage jigs, (I needed 3 1"x8"x8' boards, not 2) and
laid them on the table. I then epoxied the fuselage stringers together,
and epoxied the stiffeners and doublers to them. I was able to do all that
in one layup, rather than in two as stated in the plans. This saved some
time and effort.
So, I cut out the fuselage jigs, (I needed 3 1"x8"x8' boards, not 2) and
laid them on the table. I then epoxied the fuselage stringers together,
and epoxied the stiffeners and doublers to them. I was able to do all that
in one layup, rather than in two as stated in the plans. This saved some
time and effort.Next, I screwed all the jigs onto my table, cut out the 3/8" foam and the 1/8" masonite (and 5 min. epoxied the pieces together) to the right size, and screwed the masonite to the jigs. I then 5 min. epoxied the foam to the jigs, and then cut out the 3/4" foam to the right size (in only two tries) and sanded all the angles on it. I then microed the 3/4" foam to the 3/8" foam, and after cure sanded the fuel gauge and control handle depressions. Andreas Meyer (another HP employee here considering a Cozy MKIV) helped lay up the 2 UNI layers on the inside surface of the fuselage (shown above):
and we then peel ply'ed the whole thing. It turned out the one of the control handle depressions had a big air bubble in it, so I cut the glass away and re-layed it up with 2 ply UNI (and the ubiquitous peel-ply).
After THAT partially cured, I floxed the upper longeron in place. When everything had cured, I sanded the heck out of all the bumps and excess flox, and then floxed the lower longeron, LWX and LWY stringers in place, as well as glassed the electrical duct cutout and cover. Next, I glassed the 4 layers of UNI over the upper longerons. Then I 5 min. epoxied the electrical duct cover in place, floxed the 20" long lower longeron triangular piece in place, and cut the 3/4" foam for the space between the LWX and LWY stringers and microed it in place.
After glassing the 6 BID lower rear fuselage side layups, I removed the sides from the jigs, trimmed all the excess glass, epoxy, and flox, sanded all the bumps and joggles (not that there were very many), and then put the sides back in the jigs for end trimming. I squared up the ends, trimmed them to EXACTLY 101.75" long with a jig saw, and cut out the 5.5" x 8.7" area for the main spar.
I then had two matched fuselage sides, ready for assembly with the previously fabricated bulkheads.
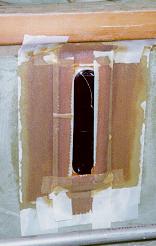 Although the logbook says this stuff was done for Chapter 6, it's really
for chapter 5. I'd had the "Vance Atkinson" fuel sight gauges sitting
around for about two years, and it was finally time to install them. I
followed the directions to the letter, and had them installed in a total
of about 4 hours of working time. Just some sanding of the plastic parts
and floxing in place, along with a couple of wet layers of BID. Pretty
simple, and MUCH nicer than the stock gauges. I highly
recommend them, for $35 or $40.
Although the logbook says this stuff was done for Chapter 6, it's really
for chapter 5. I'd had the "Vance Atkinson" fuel sight gauges sitting
around for about two years, and it was finally time to install them. I
followed the directions to the letter, and had them installed in a total
of about 4 hours of working time. Just some sanding of the plastic parts
and floxing in place, along with a couple of wet layers of BID. Pretty
simple, and MUCH nicer than the stock gauges. I highly
recommend them, for $35 or $40.In this image, you can see them glassed in and peel-ply'ed.
|
[Zeitlin's Cozy MKIV Information]
[Zeitlin's Cozy MKIV Logbook] [Cozy MKIV Information]
|