I cut the landing brake free from the bottom of the fuselage, and sanded it to shape. I sanded the brake cutout as well. Next, I cut the plywood LB-23 and LB-19 mount parts and attached them to the hinge, as well as attaching the aluminum slugs to the LB-23. I routed the foam in the fuselage bottom for LB-23 mounting, and fitted the LB-19 to the inside surface of the landing brake. After floxing the LB-19 to the landing brake, I checked the plans and realized that I HAD MOUNTED THE LB-19 IN THE MIRROR IMAGE POSITION ON THE LANDING BRAKE!!! So, I carefully ripped the LB-19 off, and waited for the flox to cure to fix the brake and reinstall the LB-19. At least I caught it before the flox had cured. This image shows the LB-19 getting floxed to the landing brake (you can see the foam insert to replace the stuff I cut away by mistake).
Yeah, so. After getting the LB-19 in the right place, I decided to
drill pilot holes through the hinge, LB-23 and aluminum slugs in
preparation for tapping. Turns out that these slugs are referenced in
two places in the plans - one says to make them 1/2" square, and the
other says to make them 5/8" square. Naturally, I saw the smaller
reference first and that's what I had installed. These were too small
and positioned incorrectly for the screws to clear the hinge pivot, so I
knocked them off, made new slugs, and 5 minute epoxied them onto the
hinge. I was then able to drill and tap the holes in a reasonable
position for the screws.
The next step involved taking 1/8" of foam off the recess for the landing brake (in the bottom of the fuselage). I used a router to get most of the foam out, and sanded down the rest. I then positioned the Landing Brake in place and hot glued 1"x2" bracing on the back to hold it in position for glassing. I removed the brake from the recess, sanded the LB smooth, radiused all the corners, and then glassed 3 BID on the top surface and peel ply'ed it.
After a partial cure, I knife trimmed the layup and then positioned the brake in the recess with the braces to ensure a correct fit.
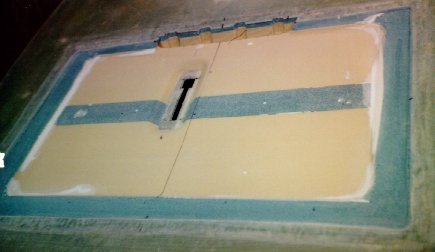
After the landing brake cured, I finished removing 1/8" foam from the recess, sanded the recess to shape, and cut a slot in the fuselage bottom for the landing brake actuator. You can see the fuselage recess, ready for LB-23 mounting and then glassing, here:
I then positioned the landing brake in the recess, 5 minute epoxied the LB-23 in place in the fuselage, and then removed the brake and the shims from LB-23. I layed up 2/3 BID over the fuselage recess and the LB-23. After cure, I sanded the layup smooth and drilled and tapped out the landing brake mounting holes. The landing brake fit well into the recess, so I wrapped it with saran wrap and microed the shallow recess left after glassing the whole recess. I pushed the landing brake down into micro to ensure a close fit.
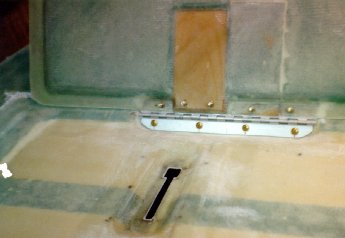
You can see the mounted landing brake hinge area, as well as the cutout in the fuselage bottom for the actuator here:
The landing brake didn't quite sit flush with the surrounding fuselage, so I glassed 3 BID under the lip and then sanded down the upper surface until it was flush. I then micro'ed the landing brake top and sanded it smooth.
After I had fit everything and sanded all the parts and recesses smooth and to shape, I removed the landing brake and stored it away.
|
[Zeitlin's Cozy MKIV Information]
[Zeitlin's Cozy MKIV Logbook] [Cozy MKIV Information]
|